
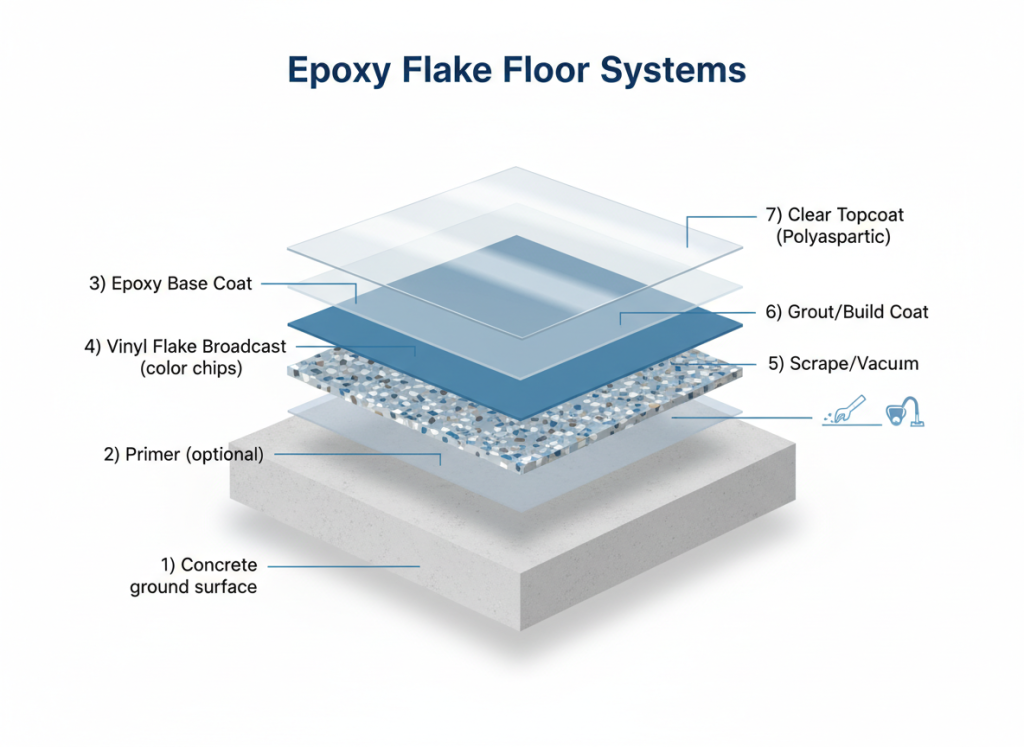
An epoxy flake floor system is a layered coating built for durability, easy cleaning, and a clean finished look. The system is simple: prep the concrete, apply an epoxy base coat, broadcast vinyl flakes, then lock everything in with a clear topcoat (often polyaspartic for UV and fast cure).
If you want a floor that holds up in garages, shops, and commercial spaces, this is the system to build.
- Durable, impact-resistant finish
- Optional slip resistance for safer footing
- Easy to clean and maintain
Shop: Epoxy Flake Kits | Vinyl Flake Chips | Polyaspartic Topcoats
What Is an Epoxy Flake Floor System?
Epoxy flake flooring isn’t just “epoxy + chips.” A proper flake system is a complete build designed to bond to concrete, create texture and color with flakes, and protect the surface with a wear layer.
Common installs:
- Garages and home workshops
- Warehouses and light industrial spaces
- Retail back-of-house and storage areas
- Commercial kitchens and utility rooms (when specced correctly)
System Components (Layer-by-Layer)
1) Concrete Prep (The Foundation)
This is where floors succeed or fail. Concrete needs:
- Clean, dry surface (no oils, sealers, curing compounds)
- Correct surface profile (mechanical grind is the standard)
- Cracks and spalls repaired before coating
- Moisture evaluated (high moisture can cause delamination)
Rule: If the concrete isn’t prepped right, the best coating in the world won’t save it.
2) Primer (Optional, But Often Smart)
A primer can help with:
- Better adhesion on marginal concrete
- Reduced outgassing bubbles
- Improved base coat wet-out
Use primer when the slab is porous, dusty, or you want maximum bond insurance.
3) Epoxy Base Coat
The base coat is the “glue layer” that holds flakes and builds thickness. A good base coat should:
- Wet out the concrete properly
- Provide working time for broadcasting flakes
- Build a consistent film thickness across the floor
4) Vinyl Flake Broadcast (Partial or Full)
Vinyl flakes add:
- Color and pattern
- Texture (and optional slip resistance)
- Better hiding of minor surface imperfections
Broadcast options:
- Partial flake: decorative, lighter coverage
- Full flake: dense coverage for a more uniform, high-end look
5) Scrape + Vacuum
After cure, remove loose flakes and level the surface:
- Scrape high points
- Vacuum thoroughly
- Prep for clear coats so they bond cleanly
This step affects how smooth the final floor feels and how evenly the topcoat lays out.
6) Grout Coat / Build Coat (Common in Full Flake Systems)
A grout coat locks down flake edges and fills voids so the topcoat can build a sealed wear layer. This is especially important for:
- Full flake floors
- Higher traffic areas
- Floors that need easier cleaning
7) Clear Topcoat (Your Wear Layer)
The topcoat determines:
- UV stability
- Scratch and chemical resistance
- Gloss level and cleanability
- Cure time and return-to-service speed
Many systems use polyaspartic topcoat for fast cure and better UV performance, especially where sunlight hits the floor.
Full Flake vs Partial Flake (Which Should You Choose?)
Partial Flake
- Faster install, less material
- More base coat visible
- Great for decorative upgrades on a budget
Full Flake
- Dense, uniform look
- Better hiding and texture control
- Common choice for “showroom” garages and higher traffic
If you want the most consistent look and a more premium finish, go full flake.
Coverage Rates & Material Planning
Material needs depend on:
- Concrete porosity and profile
- Desired thickness
- Partial vs full flake broadcast
- Topcoat count (one vs two coats)
Plan for:
- Enough base coat to keep a wet edge while broadcasting
- Enough flake to match your target coverage (partial vs full)
- A grout/build coat when doing full flake
- A topcoat that matches your UV and traffic requirements
If you tell me your target square footage, I’ll give you a clean “materials checklist” you can paste into the page.
Prep Requirements (This Is Where Floors Fail)
Most coating failures come from:
- Poor mechanical prep (too smooth, dusty, contaminated)
- Moisture vapor pressure issues
- Coating over sealers/paint/old failing coatings
- Skipping crack repair and patching
Best practice is mechanical grinding to the correct profile, then coating within the clean window.
Topcoat Options (UV, Cure Time, Durability)
Topcoat selection should match the job:
- UV exposure: choose a UV-stable clear where sunlight hits
- Fast return to service: faster cure systems reduce downtime
- Traffic: higher traffic areas need a tougher wear layer
- Slip resistance: add grit or texture where needed
If you’re building a system for a garage with sunlight exposure, a polyaspartic clear topcoat is usually the right move.
Color Options & Flake Blends
Flake color impacts:
- How much dirt shows
- How uniform the floor looks
- How “busy” the pattern feels
Light blends brighten spaces. Medium blends hide dirt. High-contrast blends look bold but can show pattern variation more.
Commercial / Industrial Use Cases
Epoxy flake floor systems are a strong fit for:
- Light industrial and warehouse areas
- Commercial storage and work bays
- Retail back rooms and receiving areas
- Showrooms and customer-facing spaces (with the right topcoat)
For heavier environments, the system should be spec’d for:
- Higher build thickness
- Stronger topcoat chemistry
- Slip resistance where required
- Maintenance plan (cleaning + recoat intervals)
FAQs
How long does an epoxy flake floor system last?
With proper prep and the right topcoat, flake systems can last for years in garages and many commercial spaces. Lifespan depends on traffic, chemicals, and maintenance.
Can I install an epoxy flake system over old epoxy?
Sometimes. The existing coating must be well-bonded and mechanically profiled. If it’s peeling, soft, or contaminated, it needs removal.
Do I need a polyaspartic topcoat?
If you want faster cure and better UV performance, polyaspartic is a strong choice. For low-UV areas, other clear coats can work depending on budget and requirements.
What concrete profile do I need?
Most systems require mechanical prep to the correct profile so the coating can bite into the slab. Grinding is the standard approach.
How much flake do I need for full flake coverage?
Full flake requires significantly more material than partial flake. The exact amount depends on flake size and target density—share your sqft and flake size and I’ll calculate a clean target.
Is epoxy flake flooring slip resistant?
It can be. Texture comes from the flake and can be increased with anti-slip additives in the topcoat for wet areas or ramps.
Ready to Build Your System?
Choose your path:
- Epoxy Flake Kits (all-in-one)
- Vinyl Flake Chips (colors and blends)
- Polyaspartic Topcoats (UV + durability)